• Home
  • About Amy
    • Privacy Policy
  • Shop Instagram
  • FAQ
  • Contact Amy
  • Categories
    • Fashion
    • Motherhood
    • Home Decor
    • Recipes
    • Favorites Lately
    • Hair & Beauty
    • Roundups
    • Travel
    • DIY
    • Fitness
  • Holiday Gift Guides
    • Gift ideas
    • Gifts for Her
    • Gifts For Him
    • gifts under $25.00
    • Gifts Under $50

Coffee Beans and Bobby Pins

Hows about a little DIY?

August 25, 2012

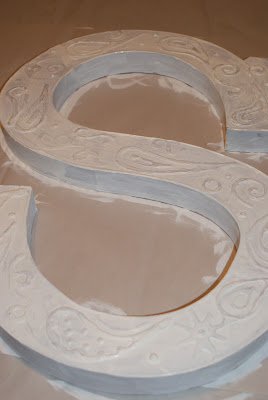
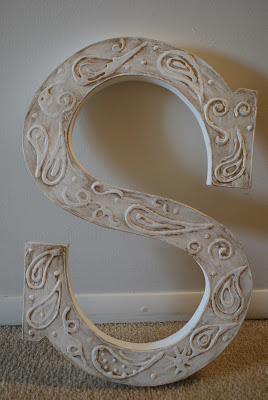
I tend to buy clothes because they go on sale. Crafts are no different. I was in JoAnn Fabrics one day (bc I had a coupon go figure) and I happened to walk down the cardboard letter aisle (pretty sure that’s the official name of that aisle). So I bought an L, because after all, that’s what my next last name will start with when I marry that guy who gave me an engagement ring. I didn’t know what I was going to do with the letter, but eventually I figured it out and I love it so much, I’m going to use it on our cake table for our wedding (propped up against the wall- or somewhere at least…). I didn’t document the making of the L, but my gf liked mine so much, she asked me to make her an S and therefore a blog post was born (thanks Jocey).
So because I know everyone needs a fancy cardboard letter, here is a simple DIY to get’cha one.

Materials Needed:
Cardboard letter
Paint in color you want for the base (I used Ivory, for like 1.99)
Metallic paint for accent
Foam brush
Paper towels
Elmer’s Glue

#1. Start with letter. With Elmer’s glue, draw design on letter. I used Paisley, Polka Dots and Swirls, you can choose whatever. You can see the blank letter on the left, wet glue in the middle and dried on the right. Once the glue was dried, I went over it one more time to make it stand up more, let dry again.

#2. Paint Letter with desired color. This will take 2-3 coats. I used 1.5 bottles of paint and painted both front and back. Let dry completely.

#3. Take metallic paint and brush over entire letter. If you’re using a BIG letter like I did, you may want to break this part up in sections. With foam brush, paint metallic over the surface area in light strokes. Then take wet paper towel and wipe off gently to achieve desired amount of metallic.

#4. Once desired amount of metallic/color is achieved, let dry and enjoy! Perfect for a wedding decoration or even a home decoration!

Thoughts? Anyone going to try this out?
Everyone enjoy your weekends, Ill see you on Monday for CCM!

Share this:

  • Click to share on Facebook (Opens in new window)
  • Click to share on Twitter (Opens in new window)
  • Click to share on Pinterest (Opens in new window)
  • Click to email a link to a friend (Opens in new window)

Related

Filed Under: DIY, wedding

Comments

  1. Avatarely says

    August 25, 2012 at 12:07 PM

    Che bello!!
    Amo la creatività!!

  2. AvatarNora Aradi says

    August 25, 2012 at 12:19 PM

    Wow, it's amazing!

    I'm running a giveaway by the way, enter if you want to! 🙂
    http://mesmemosphotoblog.blogspot.com/

  3. AvatarKristina says

    August 25, 2012 at 12:35 PM

    That's really cute! When I saw the first picture with the wet glue I wasn't sure where this was going, but it turned out fantastic. You could definitely use this for home decor too.

    Kristina

    Kristina does the Internets

  4. AvatarMontana says

    August 25, 2012 at 12:35 PM

    This is super cute!!
    I am always looking for new letters, so I will try this soon!!

  5. AvatarAnna says

    August 25, 2012 at 1:24 PM

    My mom was on a rampage with these letters (she crackled them though). I've always been a fan of the ivory/gold combo so I love the end result.

  6. AvatarGabriele says

    August 25, 2012 at 3:28 PM

    Oh wow this is so cool I love it! Xo

  7. AvatarNav says

    August 25, 2012 at 3:48 PM

    it turned out stunning! great job!

    http://navlandstyle.blogspot.ca/

  8. AvatarKelsey Carzoli says

    August 25, 2012 at 4:06 PM

    Love it! It turned out really well, I'd definitely hang it in my home

    Xo, Kelsey

    http://www.trashtotrend.blogspot.com

  9. AvatarMrs. Skeels says

    August 25, 2012 at 4:54 PM

    Great tutorial AND its my initial as well 🙂

    http://www.mrsskeelsdeals.blogspot.com

  10. Avatardots and skirts says

    August 25, 2012 at 4:56 PM

    This turned out super cute!! I might just have to try!

    http://polkadotsandpencilskirts.blogspot.com/

  11. AvatarCaroline says

    August 25, 2012 at 5:59 PM

    Such a cute DIY! Thanks for sharing 🙂

  12. Avatardarkheart2011 says

    August 25, 2012 at 6:13 PM

    You has a great blog. I'm very interesting to stopping here and leaves you a comment. Good work.

    Lets keep writing and blogging

    Nb: Dont forget to leave your comment back for us.

  13. AvatarKristen says

    August 25, 2012 at 6:15 PM

    That's awesome! I love DIY posts! Will be doing this!!

    http://www.everydaywitharedhead.blogspot.com

  14. AvatarHilary says

    August 25, 2012 at 6:39 PM

    Wow, looks awesome! I would buy that!

  15. AvatarMary Ann says

    August 25, 2012 at 8:37 PM

    This turned out super cute, Amy! I was a little unsure where you were going with it, haha, but I love the finished result! 😉

  16. AvatarMiriammm says

    August 25, 2012 at 9:31 PM

    that looks great! looks very easy! thanks for sharing!

  17. AvatarGo For The Glam says

    August 26, 2012 at 1:23 AM

    I love this!! I may have to try!

  18. AvatarDarby says

    August 26, 2012 at 4:23 AM

    Oh I LOVE this! SOOO shabby chic!!! It would be perfect in my apartment 😉
    xoxo Darby
    Obviously Obsessed 

  19. AvatarAlexa says

    August 26, 2012 at 4:32 AM

    very cool! i always love DIY posts

    alexa <3
    http://sleepeatbreathefashion.blogspot.com/

  20. AvatarJocey says

    August 26, 2012 at 5:09 AM

    This turned out so great aims! I love it! Thanks so much for taking the time to make it for me, for puttin it on your post, and for giving me a shout out! Your one amazing friend! Love you!

  21. Avatarjust me says

    August 26, 2012 at 6:09 AM

    this is so beautiful.
    ExCurlyThoughts
    FACEBOOK
    BlogLovin

  22. AvatarEdyta says

    August 26, 2012 at 9:37 AM

    Oh-my-days! So super cute! I need to whip up an E like that! Adore the idea & thanks for sharing 😉

    Edita
    http://www.pret-a-reporter.co.uk

  23. AvatarAmy says

    August 26, 2012 at 10:53 AM

    Great DIY!

    Amy

    Leopard and Lillies

  24. AvatarMica says

    August 26, 2012 at 11:48 AM

    What a great DIY! I love the finished result 🙂

  25. AvatarAnne says

    August 26, 2012 at 1:24 PM

    WOW, I have to try this myself one time 😀
    Would you maybe like to follow eachother? Love,
    Anne

    movieanne.blogspot.com

  26. AvatarDi - City and Burbs says

    August 26, 2012 at 2:02 PM

    Love this DYI! I actually would love to try this for my bedroom :-). Thanks!
    Xx,
    DI
    http://cityandburbsblog.com

  27. AvatarPatti says

    August 26, 2012 at 2:59 PM

    Hello! i like your blog! Im following you now! if you like my blog, follow me back please! XoXo

    http://www.shoesandbasics.com

  28. AvatarCourtney Starr says

    August 26, 2012 at 4:54 PM

    I love how that came out!

    girlavantgarde.com

  29. AvatarSarah says

    August 26, 2012 at 5:43 PM

    Craft stores are such a dangerous place for me because I get tons of hair-brained ideas that I don't need to do but would LIKE to. This turned out lovely, by the way. (:

  30. AvatarBodil Huisman says

    August 26, 2012 at 7:00 PM

    wauw that looks so great.
    amazing Do It Yourself!!

    LOVE BO,
    PurePreciousPerfection.blogspot.com

  31. AvatarMegan, TfDiaries.com says

    August 26, 2012 at 7:01 PM

    adorable
    Xo Megan

  32. AvatarStaceyFacex says

    August 26, 2012 at 7:28 PM

    so lovely! absolutely beautiful idea! xx

  33. AvatarA J says

    August 26, 2012 at 9:00 PM

    Beautiful! And looks pretty simple.

    -AJ
    FitTravelerAJ.blogspot.com

  34. AvatarAMY PALMER says

    August 26, 2012 at 9:09 PM

    This is so clever! Love the look of the metallic finish. Thanks for visiting Blank Pages!

    -Amy
    http://theblankpagesblog.blogspot.com/

  35. AvatarAnnie L says

    August 26, 2012 at 9:20 PM

    Wow, love how you made it look vintage.
    xo Annie
    newenglandromance.blogspot.com

  36. AvatarMeggan says

    August 26, 2012 at 9:42 PM

    So creative and it came out so well! Love Joann's coupons 🙂

  37. AvatarRachel says

    August 26, 2012 at 10:25 PM

    This came out so well! I did something similar back in college with mine and my roommate's initials and then made one for my boyfriend for his birthday. You really can do so much with those wooden letters!

    Life Unsweetened

  38. AvatarSunny & Star says

    August 26, 2012 at 11:39 PM

    That looks incredibly adorable. I am not crafty at all or I would give this a try.

    Tracy @ Sunny Days and Starry Nights

    I'm currently having a giveaway on my blog. Please stop by and enter. Giveaway

  39. AvatarHead to Toe Chic says

    August 27, 2012 at 1:23 AM

    I'm sooooo trying this! I love the way it turned out!

    xo,
    Angela
    headtotoechic.blogspot.com

  40. Avatars says

    August 27, 2012 at 2:45 AM

    you r amazing!!!! i def want to try this!!!!!!
    xO!
    http://www.thehautecookie.com

  41. AvatarJessica @ Here(and)Now says

    August 27, 2012 at 3:28 AM

    I totally stock up/hoard on sale craft items too! Love this DIY… looks so much more luxe than the original materials actually are… but who would ever know!
    xx
    Here&Now

  42. AvatarIzzy says

    August 27, 2012 at 3:35 AM

    love the design you did over the letter! very pretty final result 🙂

    metallicpaws.blogspot.com

  43. AvatarKatharina says

    August 27, 2012 at 6:21 AM

    oh wow, sooo creative and very good idea!

    http://www.ketchembunnies.com

  44. AvatarLaura (White Winters) says

    August 27, 2012 at 11:23 AM

    That looks great, very creative!

    Laura
    http://www.whitewintersblog.com

  45. AvatarJenny Lauren says

    August 27, 2012 at 2:14 PM

    Fabulous DIY!! I have an unhealthy obsession with monogramming and my initials. I'm DEFINITELY going to try this!

    xo Jenny
    http://www.crazystylelove.com

  46. Avatarstylemailbox says

    August 27, 2012 at 7:55 PM

    wow, you did a great job. this looks so good!!

    http://www.stylemailbox.blogspot.com

  47. AvatarKristin says

    August 28, 2012 at 9:36 PM

    whoa, this is really cool, will definitely have to try this out, especially when I move into an actual home in a year

  48. Avatarcaroline says

    August 28, 2012 at 9:45 PM

    really awesome. looks like an expensive, engraved piece of wood! i want to see the one that you did!!

    sweatshirt-weather.blogspot.com

  • Bloglovin
  • Email
  • Facebook
  • Instagram
  • Pinterest
  • Snapchat
  • Twitter

Instagram @amy_cbandbp

Currently Loving: Fashion

Currently Loving: Home

Currently Loving: Baby Gear

Advertise

Archives

Categories

Recent Posts

  • Moose Joy Toys with My Girl
  • Hard to Shop for Holiday Gift Ideas
  • 5 Tips for Easy School Mornings
  • Summer Home Check List
  • Office Bathroom Glow Up

Follow my Pins

  • 2023 let's do it! #sponsored I haven't been able to run in SO long and thanks to @athletico_pt, I'm getting back into the swing of things. You can get a free assessment today by visiting the link in my bio! *Per federal guidelines, beneficiaries of plans such as Medicare, Medicaid, Tricare, VHA and other federally funded plans are not eligible for free assessments.
  • Does your laundry room look hectic like this today? Want to know something that makes it easier? Auto Dispense. Yes please. The @samsung_home Bespoke Washer can store and auto dispense up to 32 loads of detergent and softener, so you don't waste detergent? How about that for #smart Can I get a hallelujah!? Click here to learn more! https://bit.ly/3hnkMem #SamsungBespoke #SamsungBespokeAILaundry #BespokeAILaundry #Sustainability Sponsored by Samsung
  • Meet my new Samsung Bespoke Washer and Dryer. I've never been so in love with an appliance before. The new AI Smart Dial remembers past cycle settings, saving you time and energy in the laundry room. Click below to learn more! #SamsungBespoke #SamsungBespokeAILaundry #BespokeAILaundry #Sustainability @sumsung_home
  • No more running the dryer over and over again until your clothes are dry. With the new Bespoke Dryer AI Optimal Dry feature, our dryer triggers when the clothing is dry and automatically turns off saving time and energy on laundry day and more time snuggling on the couch. :) Click below to learn more! #SamsungBespoke #SamsungBespokeAILaundry #BespokeAILaundry #Sustainability______
Dealspotr
Dealspotr.com

Copyright © 2025 · Coffee Beans and Bobby Pins · Site Design by How Sweet Designs

We are using cookies to give you the best experience on our website.

You can find out more about which cookies we are using or switch them off in settings.

Coffee Beans and Bobby Pins
Powered by  GDPR Cookie Compliance
Privacy Overview

This website uses cookies so that we can provide you with the best user experience possible. Cookie information is stored in your browser and performs functions such as recognising you when you return to our website and helping our team to understand which sections of the website you find most interesting and useful.

Strictly Necessary Cookies

Strictly Necessary Cookie should be enabled at all times so that we can save your preferences for cookie settings.

If you disable this cookie, we will not be able to save your preferences. This means that every time you visit this website you will need to enable or disable cookies again.