• Home
  • About Amy
    • Privacy Policy
  • Shop Instagram
  • FAQ
  • Contact Amy
  • Categories
    • Fashion
    • Motherhood
    • Home Decor
    • Recipes
    • Favorites Lately
    • Hair & Beauty
    • Roundups
    • Travel
    • DIY
    • Fitness
  • Holiday Gift Guides
    • Gift ideas
    • Gifts for Her
    • Gifts For Him
    • gifts under $25.00
    • Gifts Under $50

Coffee Beans and Bobby Pins

One Room Challenge Week 3: Mud Room Bench

May 21, 2020

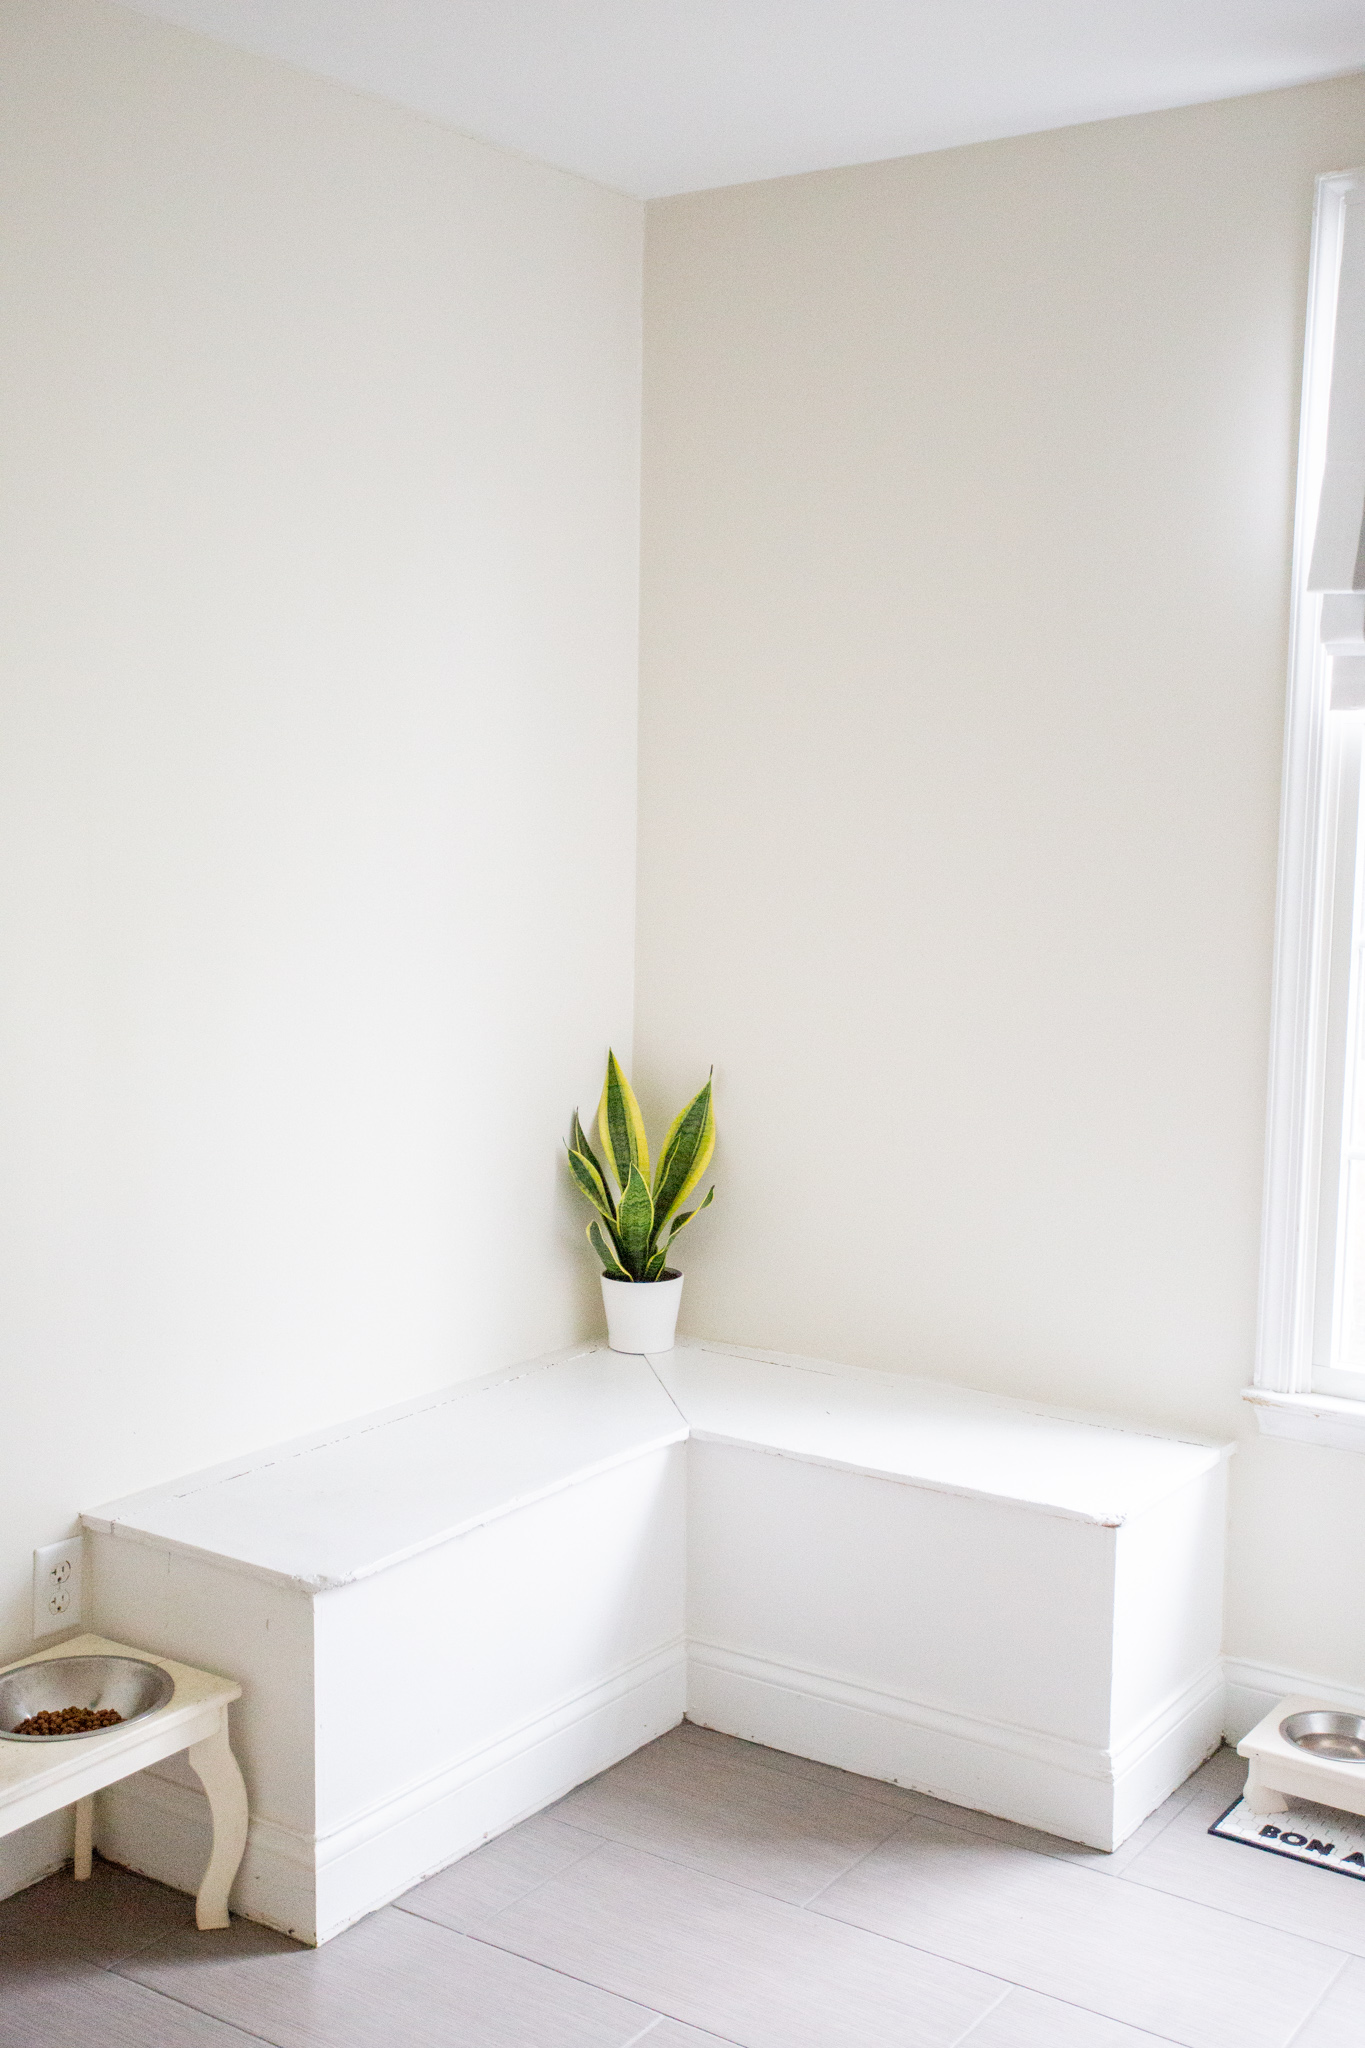
Who’s ready for another installment of the Spring 2020 One Room Challenge? This room is coming along nicely, and one of the biggest changes to the room was the update to the old and dilapidated bench that was here upon move in. The “bones” of the bench were okay, but the top has been chewed by an animal of some sort and just having a random bench in the corner seemed pretty sad and lonely. As you remember, I picked this wallpaper (but in actual wallpaper, not peel and stick) for the room from Livette’s Wallpaper, but I knew we’d need to do the bench seat makeover first and foremost.

Here is a reminder of what the bench looked like upon move in. Notice the chewed corners and the missing quarter round (it was missing in the entire room). This is also the color the WHOLE house was painted a creamy, yellow-y white. Not my fave.

One Room Challenge by popular life and style blog, Coffee Beans and Bobby Pins: image of a mudroom bench with a snake tongue plant on it.

One Room Challenge Mudroom Bench Makeover

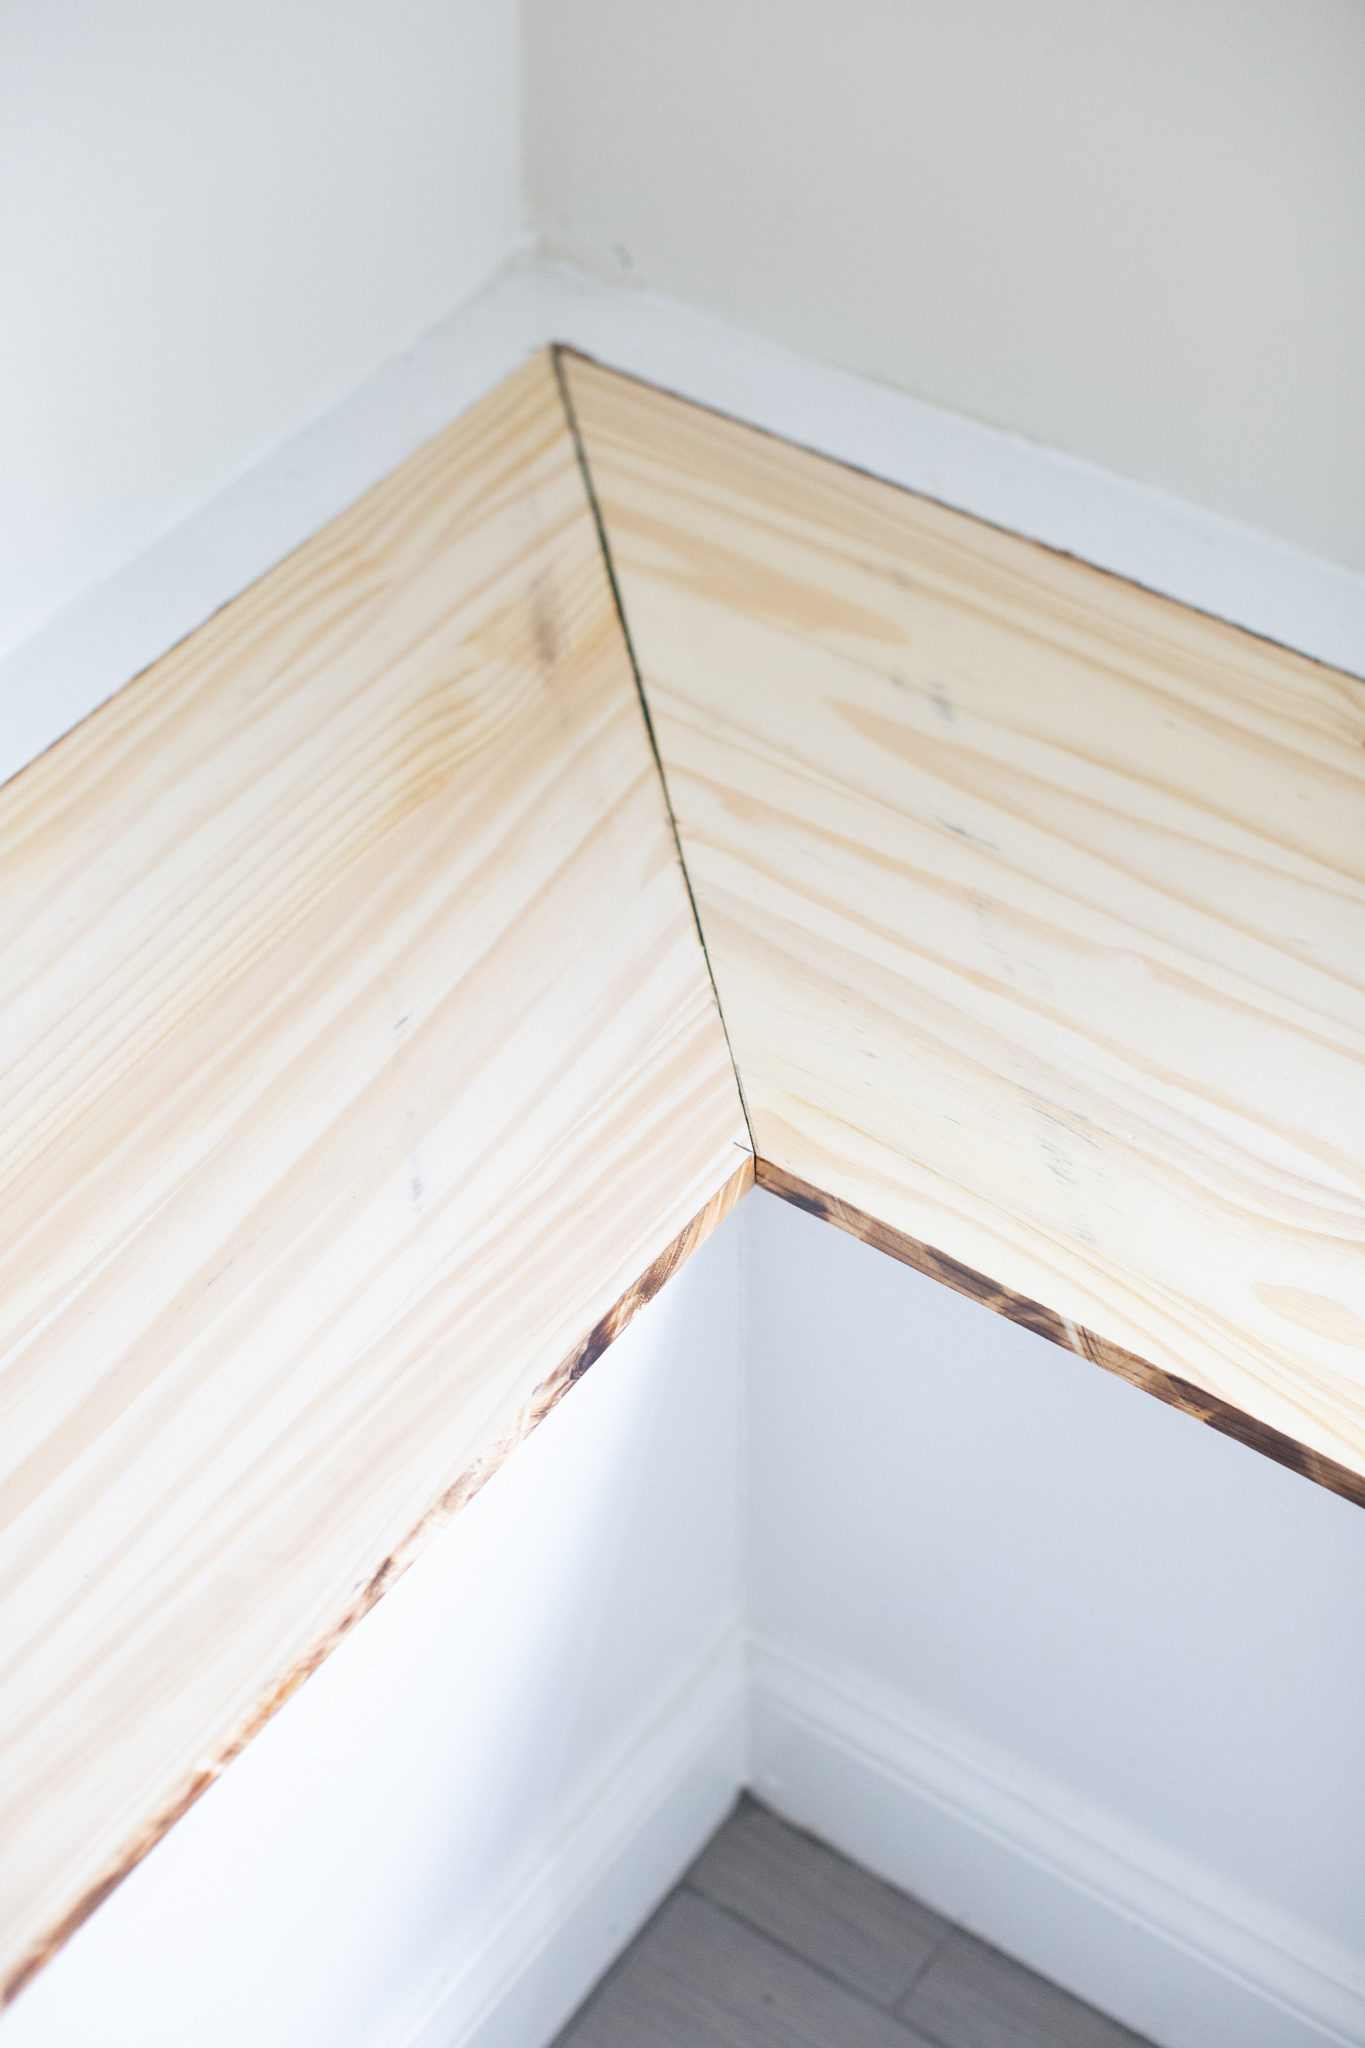
We’ve actually done a post on building a bench seat before (here), if you’re interested in how to construct one from scratch, but for this project we only replaced the top. I knew with the quarter round added back in and a fresh coat of paint, the structure of the bench was fine as long as we got the chewed area fixed. Again, you can read our instructions for bench seat tops in this post. For this seat, we used we used 1 inch thick board that can be found in lumbar aisle. There are a lot of varieties such as poplar or pine, price pending which would you choose.

One Room Challenge by popular life and style blog, Coffee Beans and Bobby Pins: image of unpainted mudroom bench.

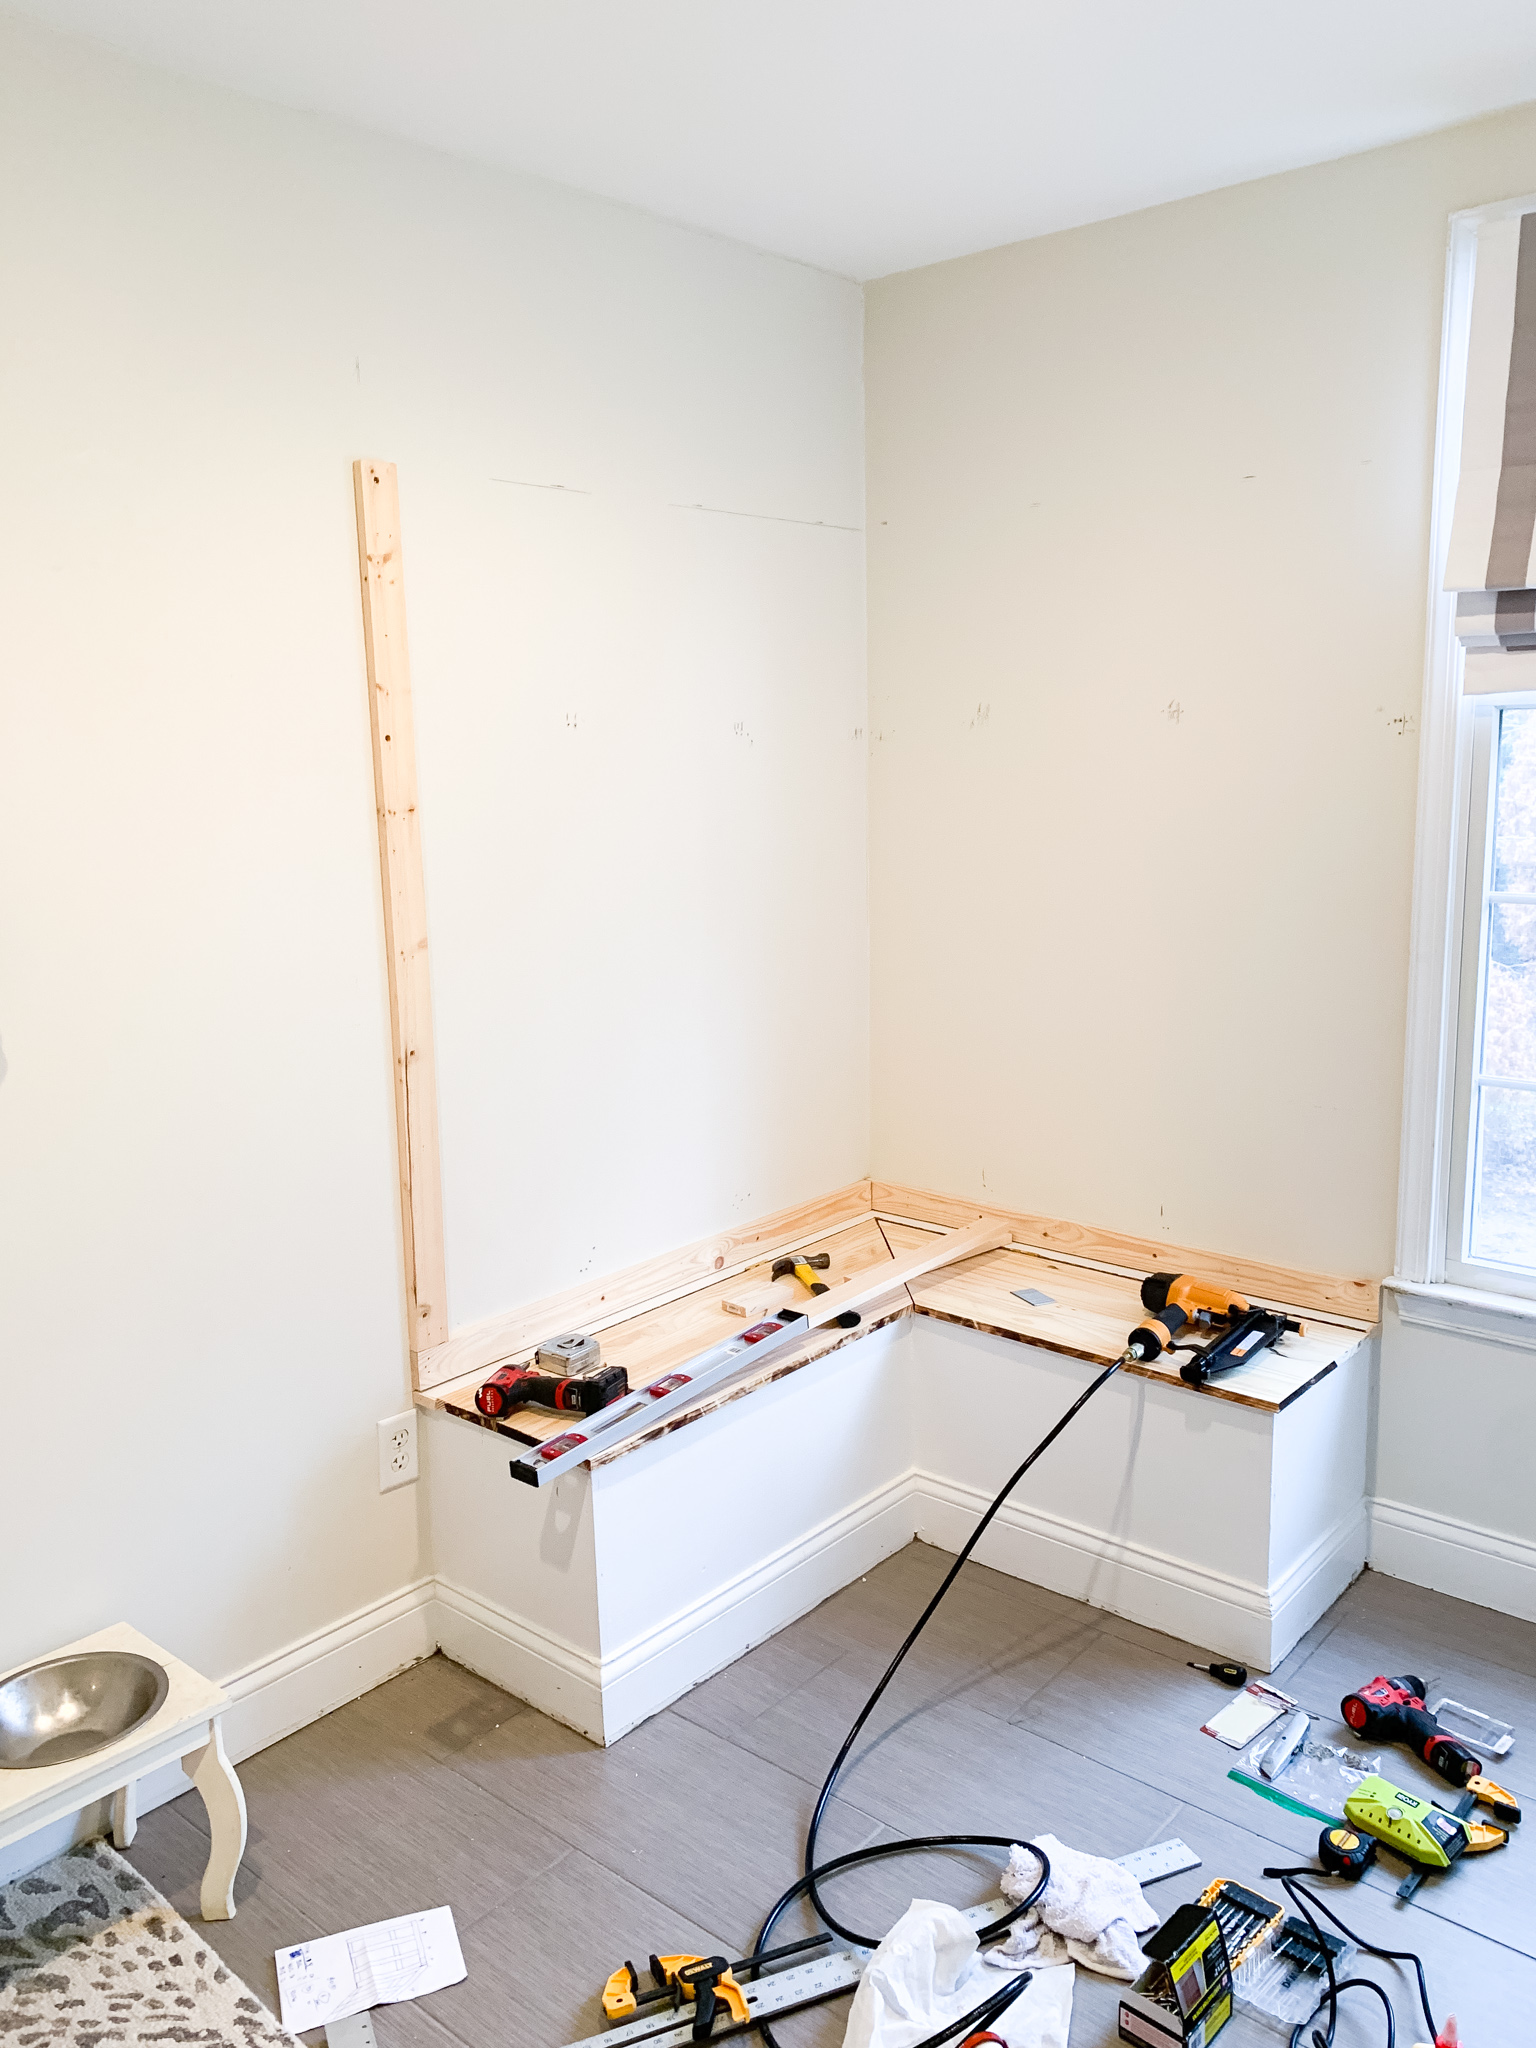
Once the new wood was installed for the top, it was time to do the board and batten (AKA, the fun part that transforms the room). Here are the steps we took to complete the project’s layout:

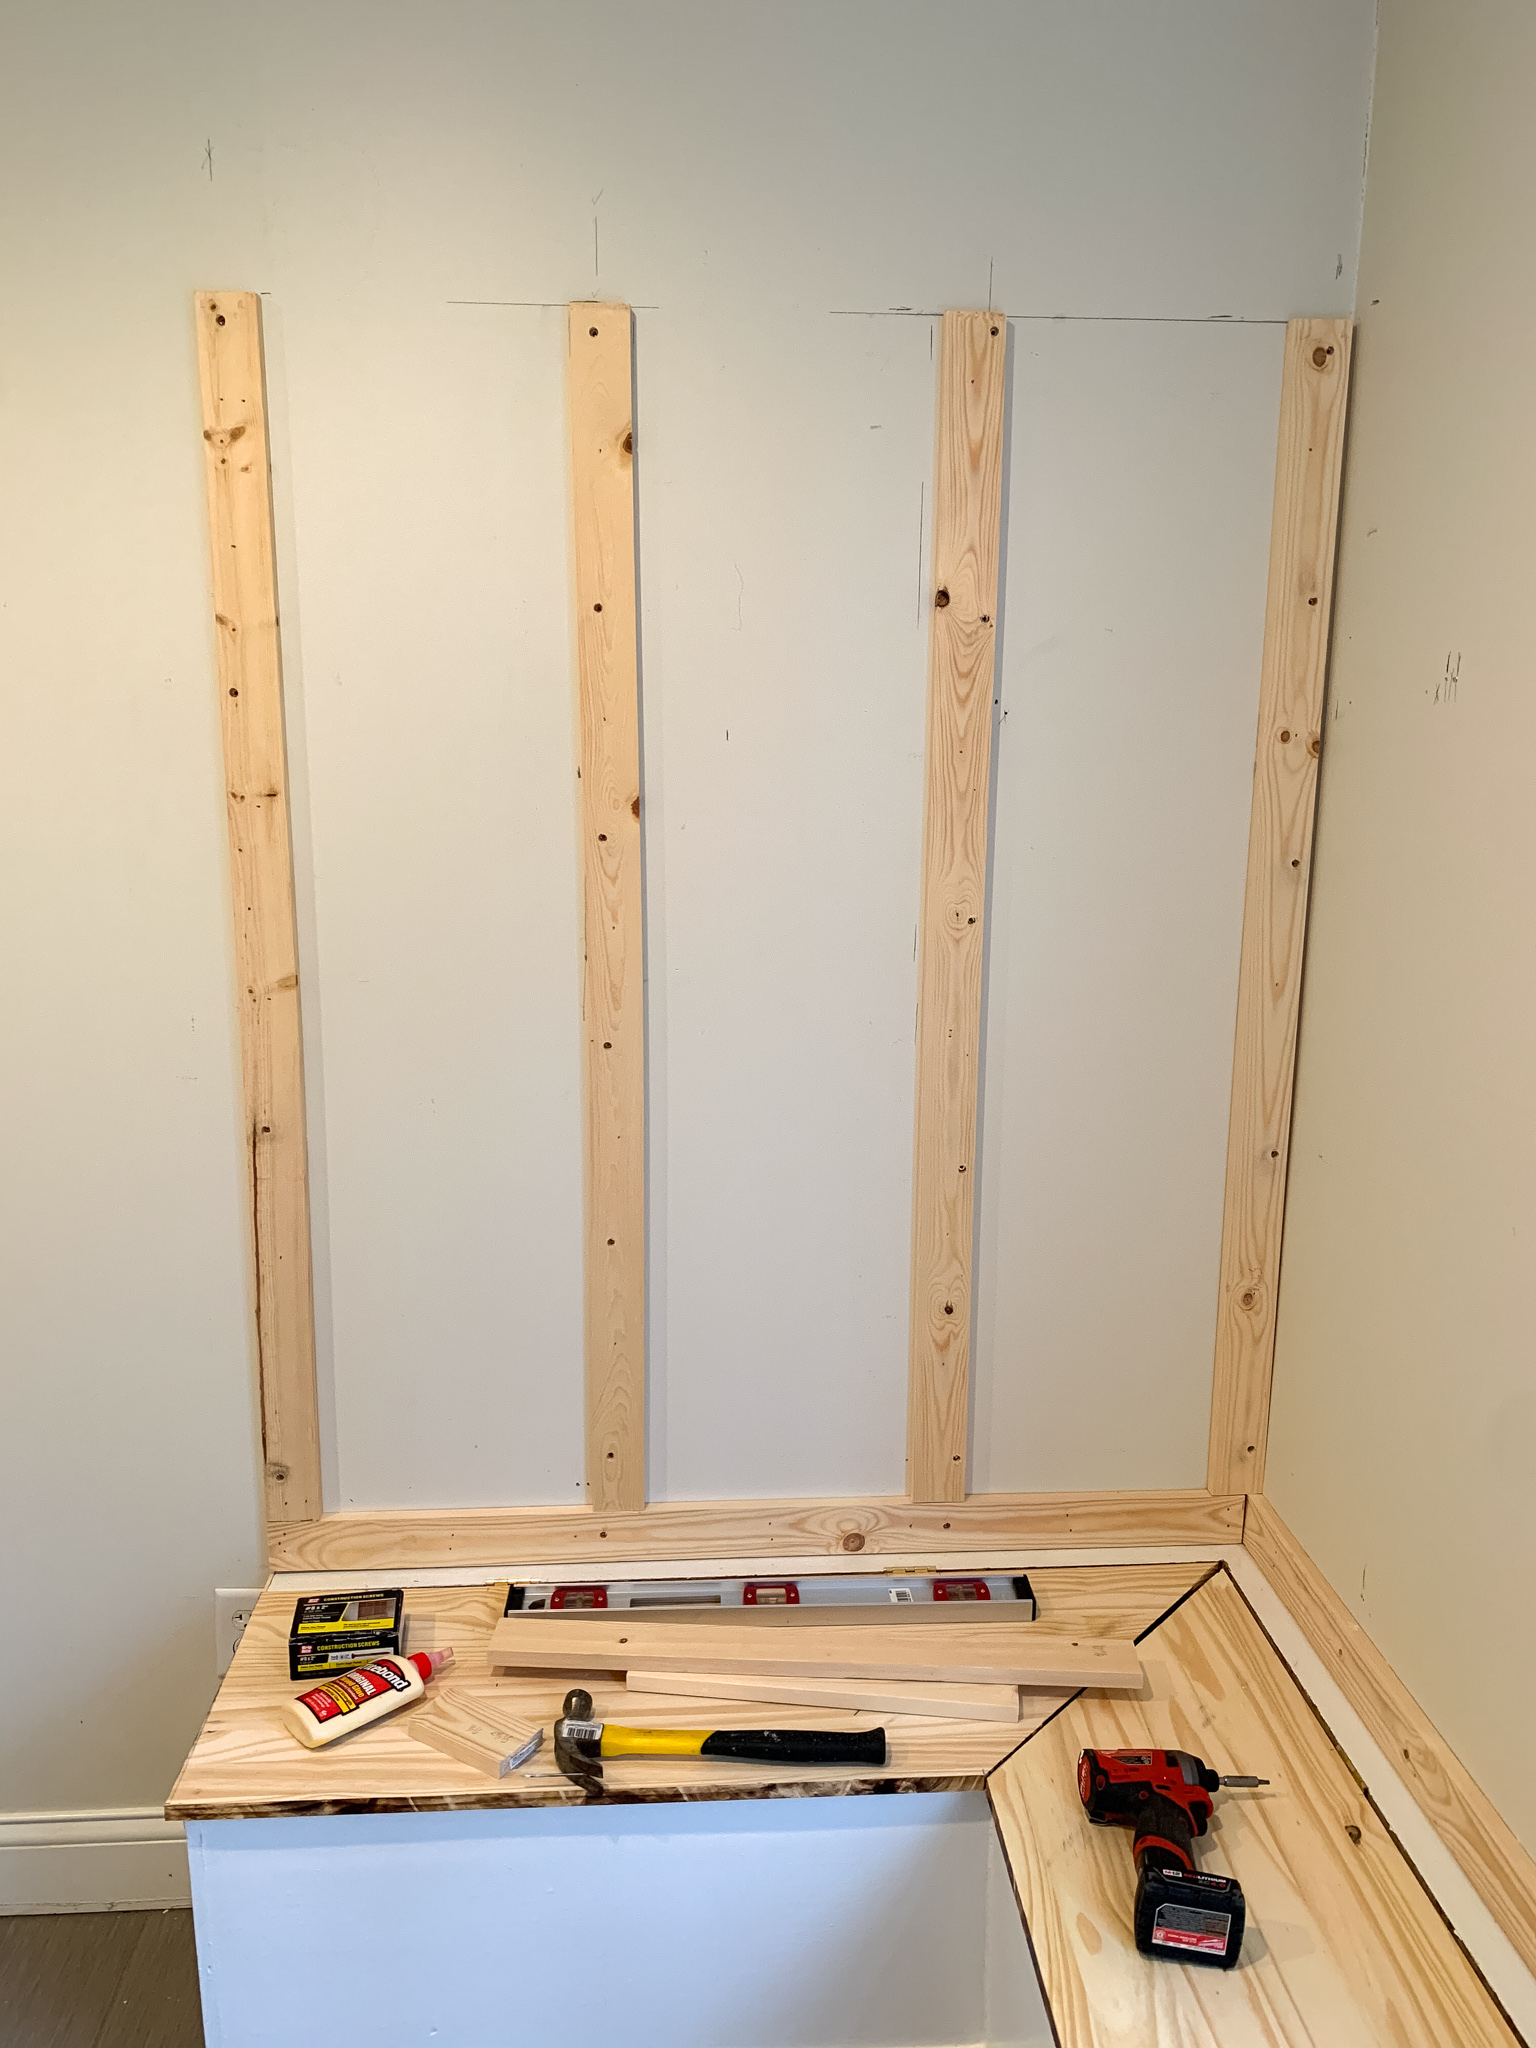
  • First we made a brace to make the board and batten starting from the bottom up. The two strips laid flush against the back of the bench seat, laying parallel. We used 1x3x8 inch pine boards, but again, you could alternatively use common board which is slightly cheaper or furring strips which are the cheapest. To secure the boards we used Loctite construction adhesive to paste to the back of the boards and then drilled 1-2 screws per board into studs in the wall for extra durability. It probably was not necessary to screw into the studs but we wanted extra support since we were putting a shelf on top. After that, we used a brad nailer to secure them to the wall.
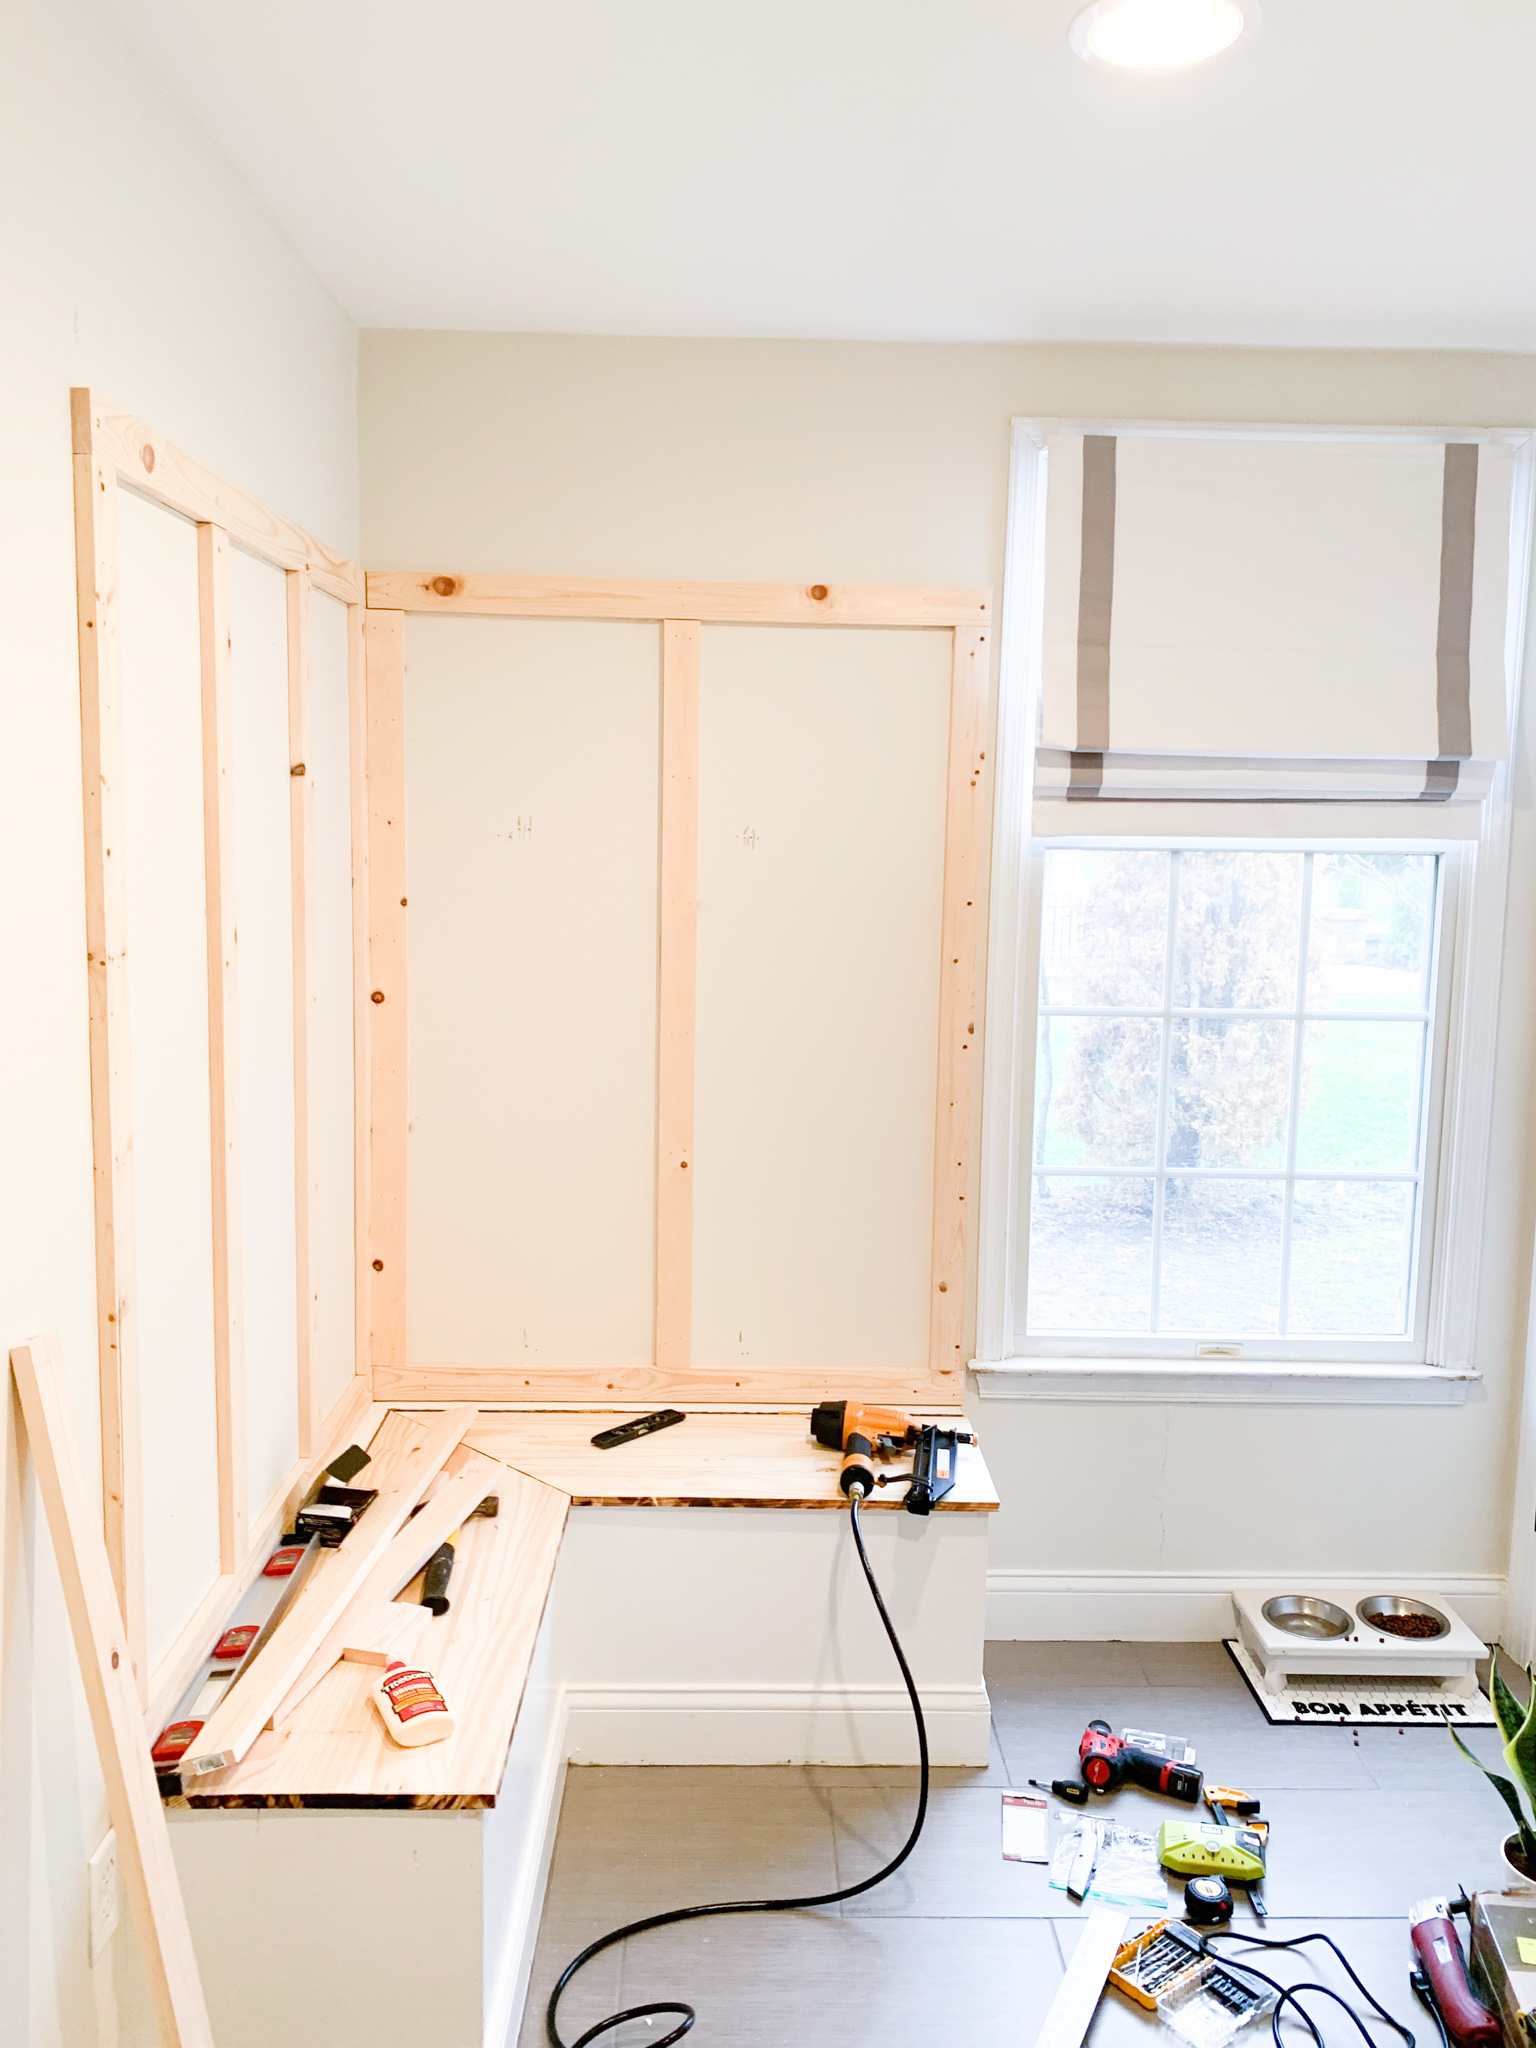
  • After our first pieces were down horizontally (I forgot to take a pic, but you’ll see in the one below, we started to build vertically. We chose to go up about 42.5 inches to the bottom of the top box. The width was determined by dividing the space into three sections, using 2 vertical pieces in between (for the left side of bench).We then repeated the measurements for the other side. These boards were secured the same way as in #1; Loctite, Screws into studs and then brad nailer.

One Room Challenge by popular life and style blog, Coffee Beans and Bobby Pins: image of mudroom filled with various work tools and a partially built work bench.

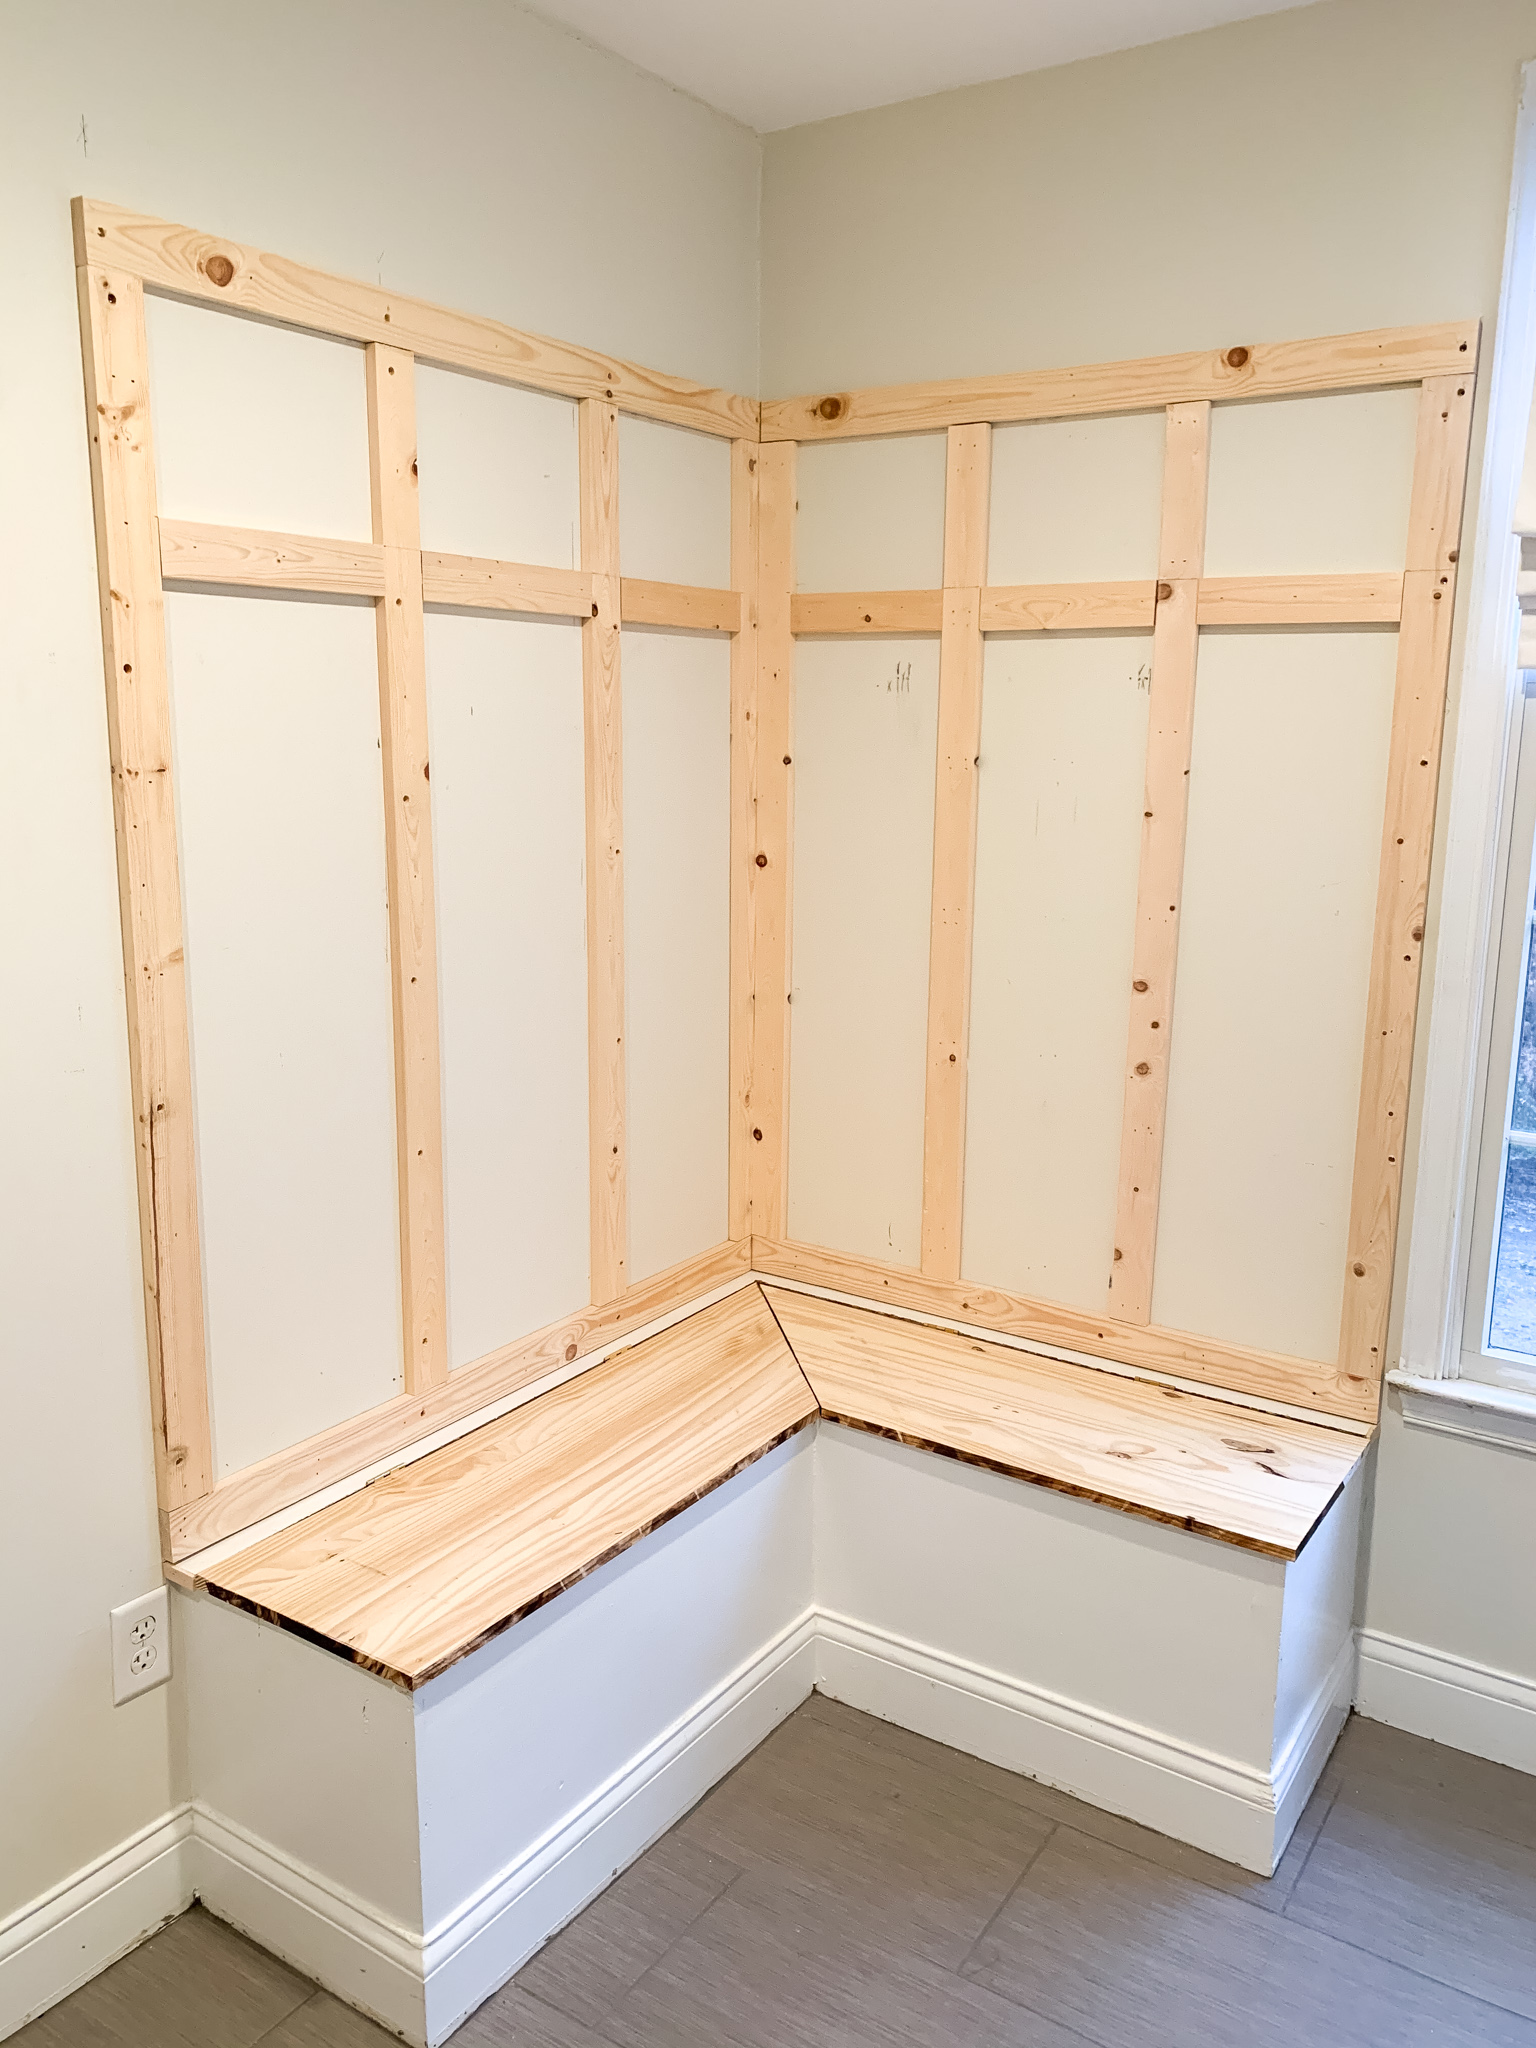
  • Keep repeating bullets #1 and #2 until you have this:

One Room Challenge by popular life and style blog, Coffee Beans and Bobby Pins: image of horizontal pieces of wood being nailed into a wall above a mudroom bench.

  •  Next, we used another horizontal piece at the top to complete the outer frame.

One Room Challenge by popular life and style blog, Coffee Beans and Bobby Pins: image of mudroom filled with various work tools and a partially built work bench.

  • Then, it was time to box in the B&B. We chose a height of about 9.5 inches for the top box. We didn’t choose an exact fraction of the entire height but more-so eyeballed where we felt it looked “right.” Anything at least 2/3 of the entire height or higher will do. We created the space between the top and bottom box by placing small pieces of wood in between each vertical strip to fit the width at our desired height. If it doesn’t fit 100% that’s okay. Caulk is your best friend, I promise!

One Room Challenge by popular life and style blog, Coffee Beans and Bobby Pins: image of mudroom bench with horizontal pieces of wood nailed into the wall above it.

  • Next we screwed in these shelf supports we bought online here and lastly, placed the same kind of wood we used for the bench seats on the top to create a shelf. We used a brad nailer to nail in the top shelving to the horizontal support and then cut the two pieces at a 45 degree angle to add a more custom look in the corner. You could also square cut this, but we wanted to it match the 45 degree on the seat.

One Room Challenge by popular life and style blog, Coffee Beans and Bobby Pins: image of mudroom bench with wood shelving above it. One Room Challenge by popular life and style blog, Coffee Beans and Bobby Pins: image of a woman using some caulk on her mudroom bench project.

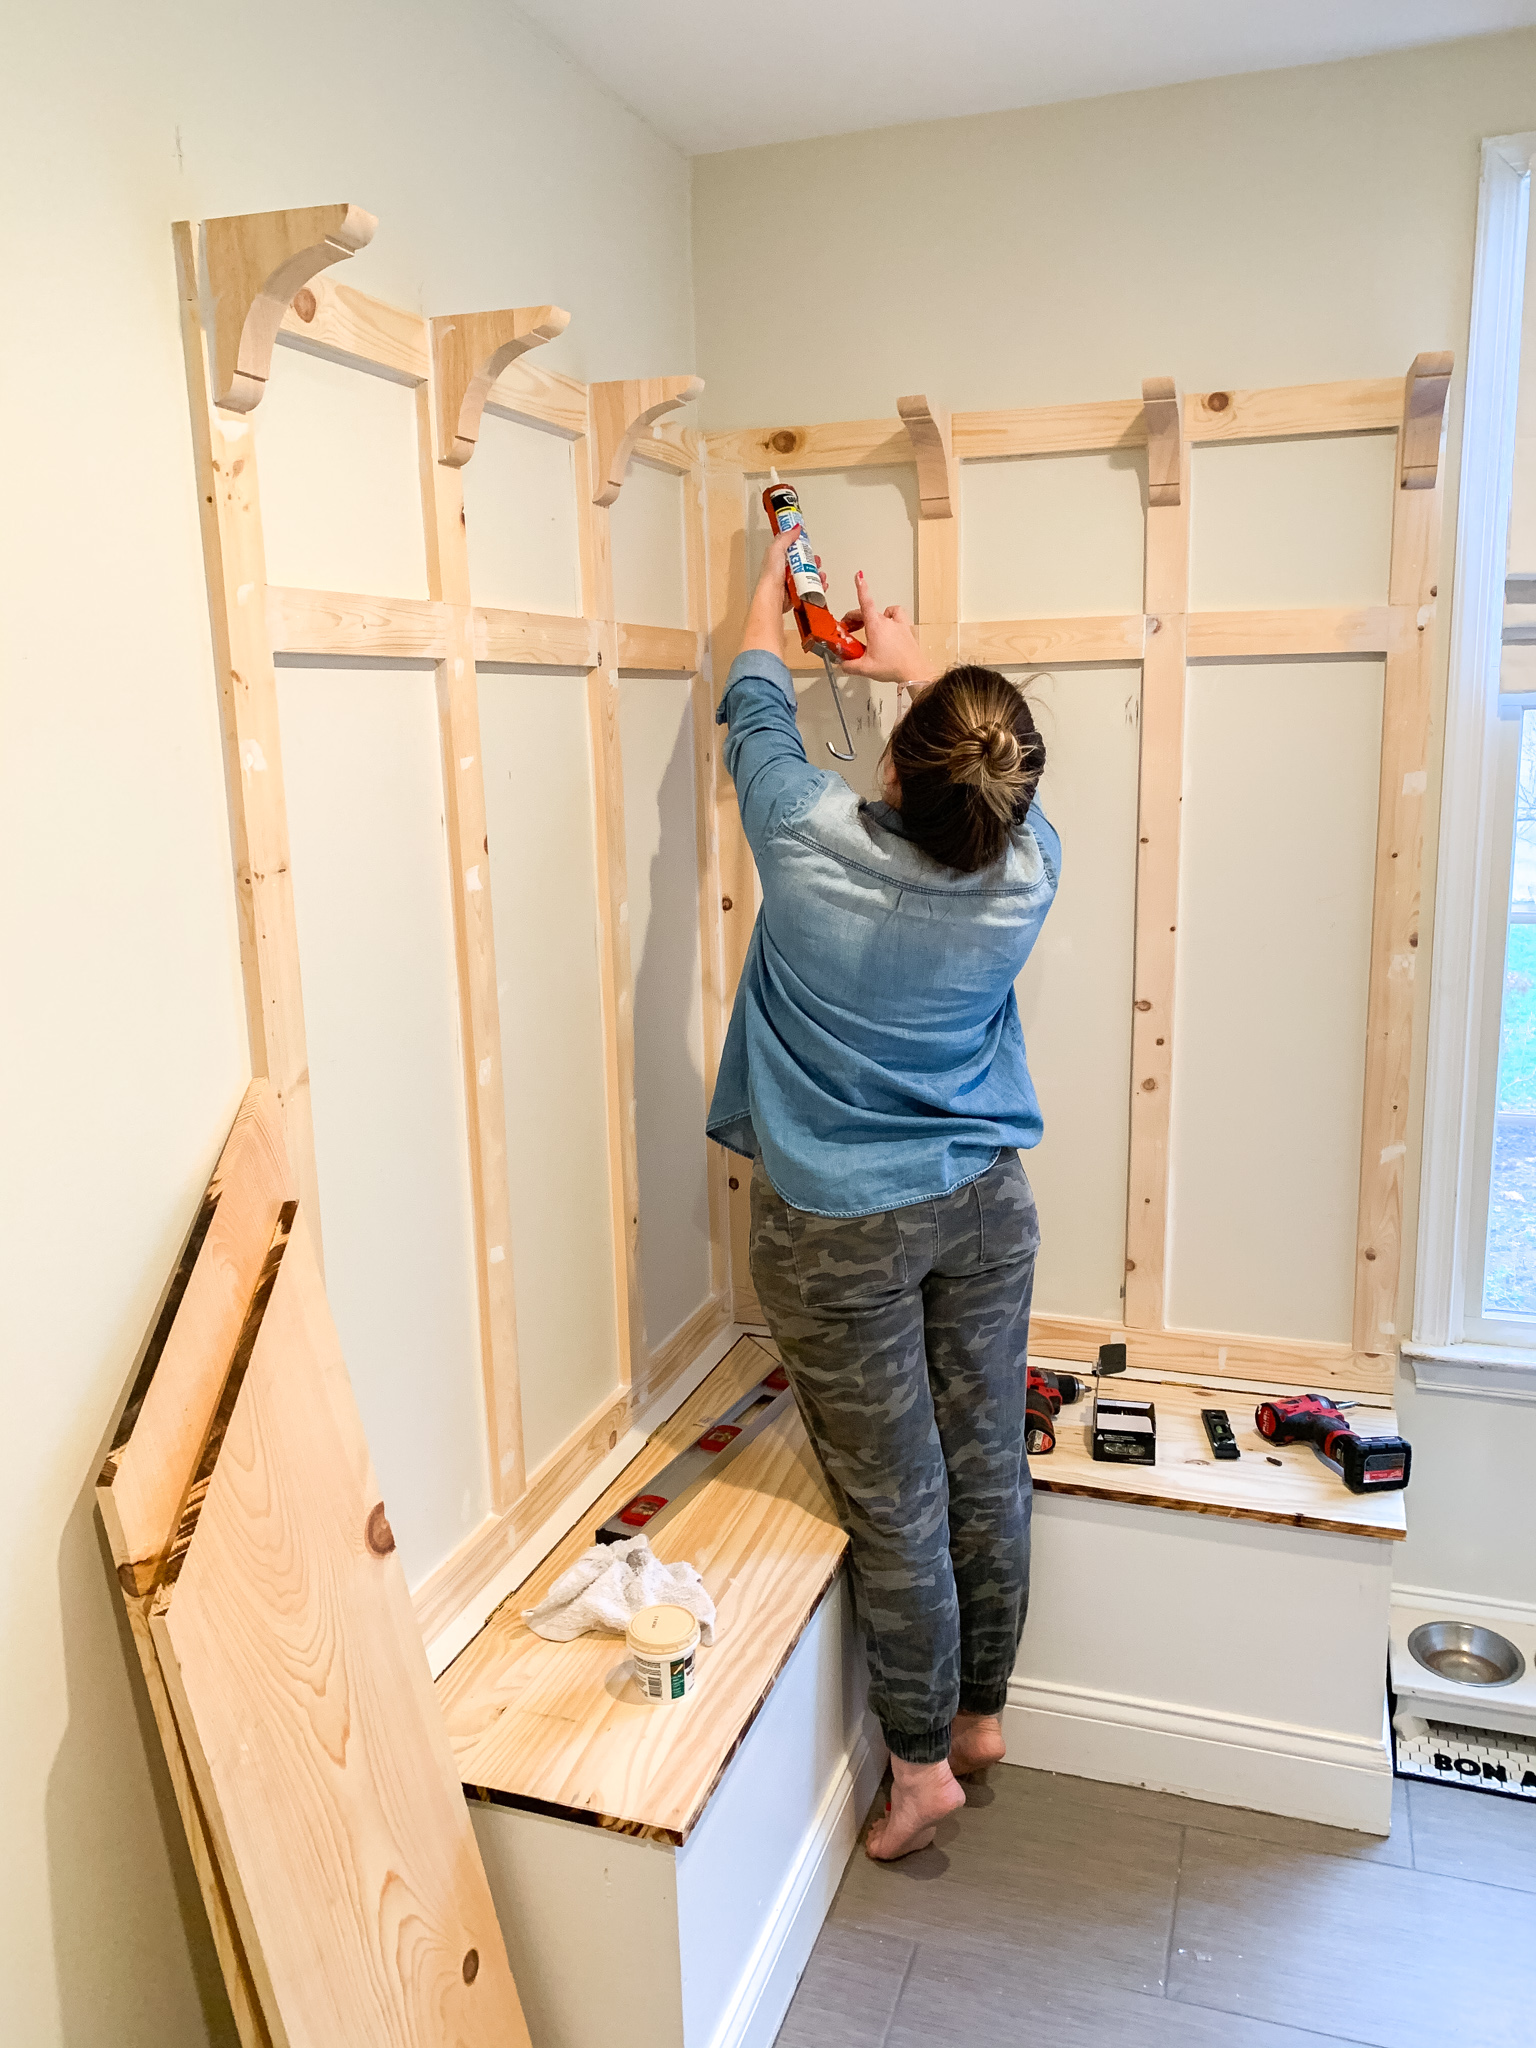
  • Last step is just caulk, caulk, caulk, and more caulk in between all the gaps and imperfections and then paint, paint and paint.

It doesn’t look like much in the photos above, but here is how it ended up looking once we installed these hooks from Amazon.

One Room Challenge by popular life and style blog, Coffee Beans and Bobby Pins: image of a white mudroom bench with overhead shelving and black metal wall hooks.

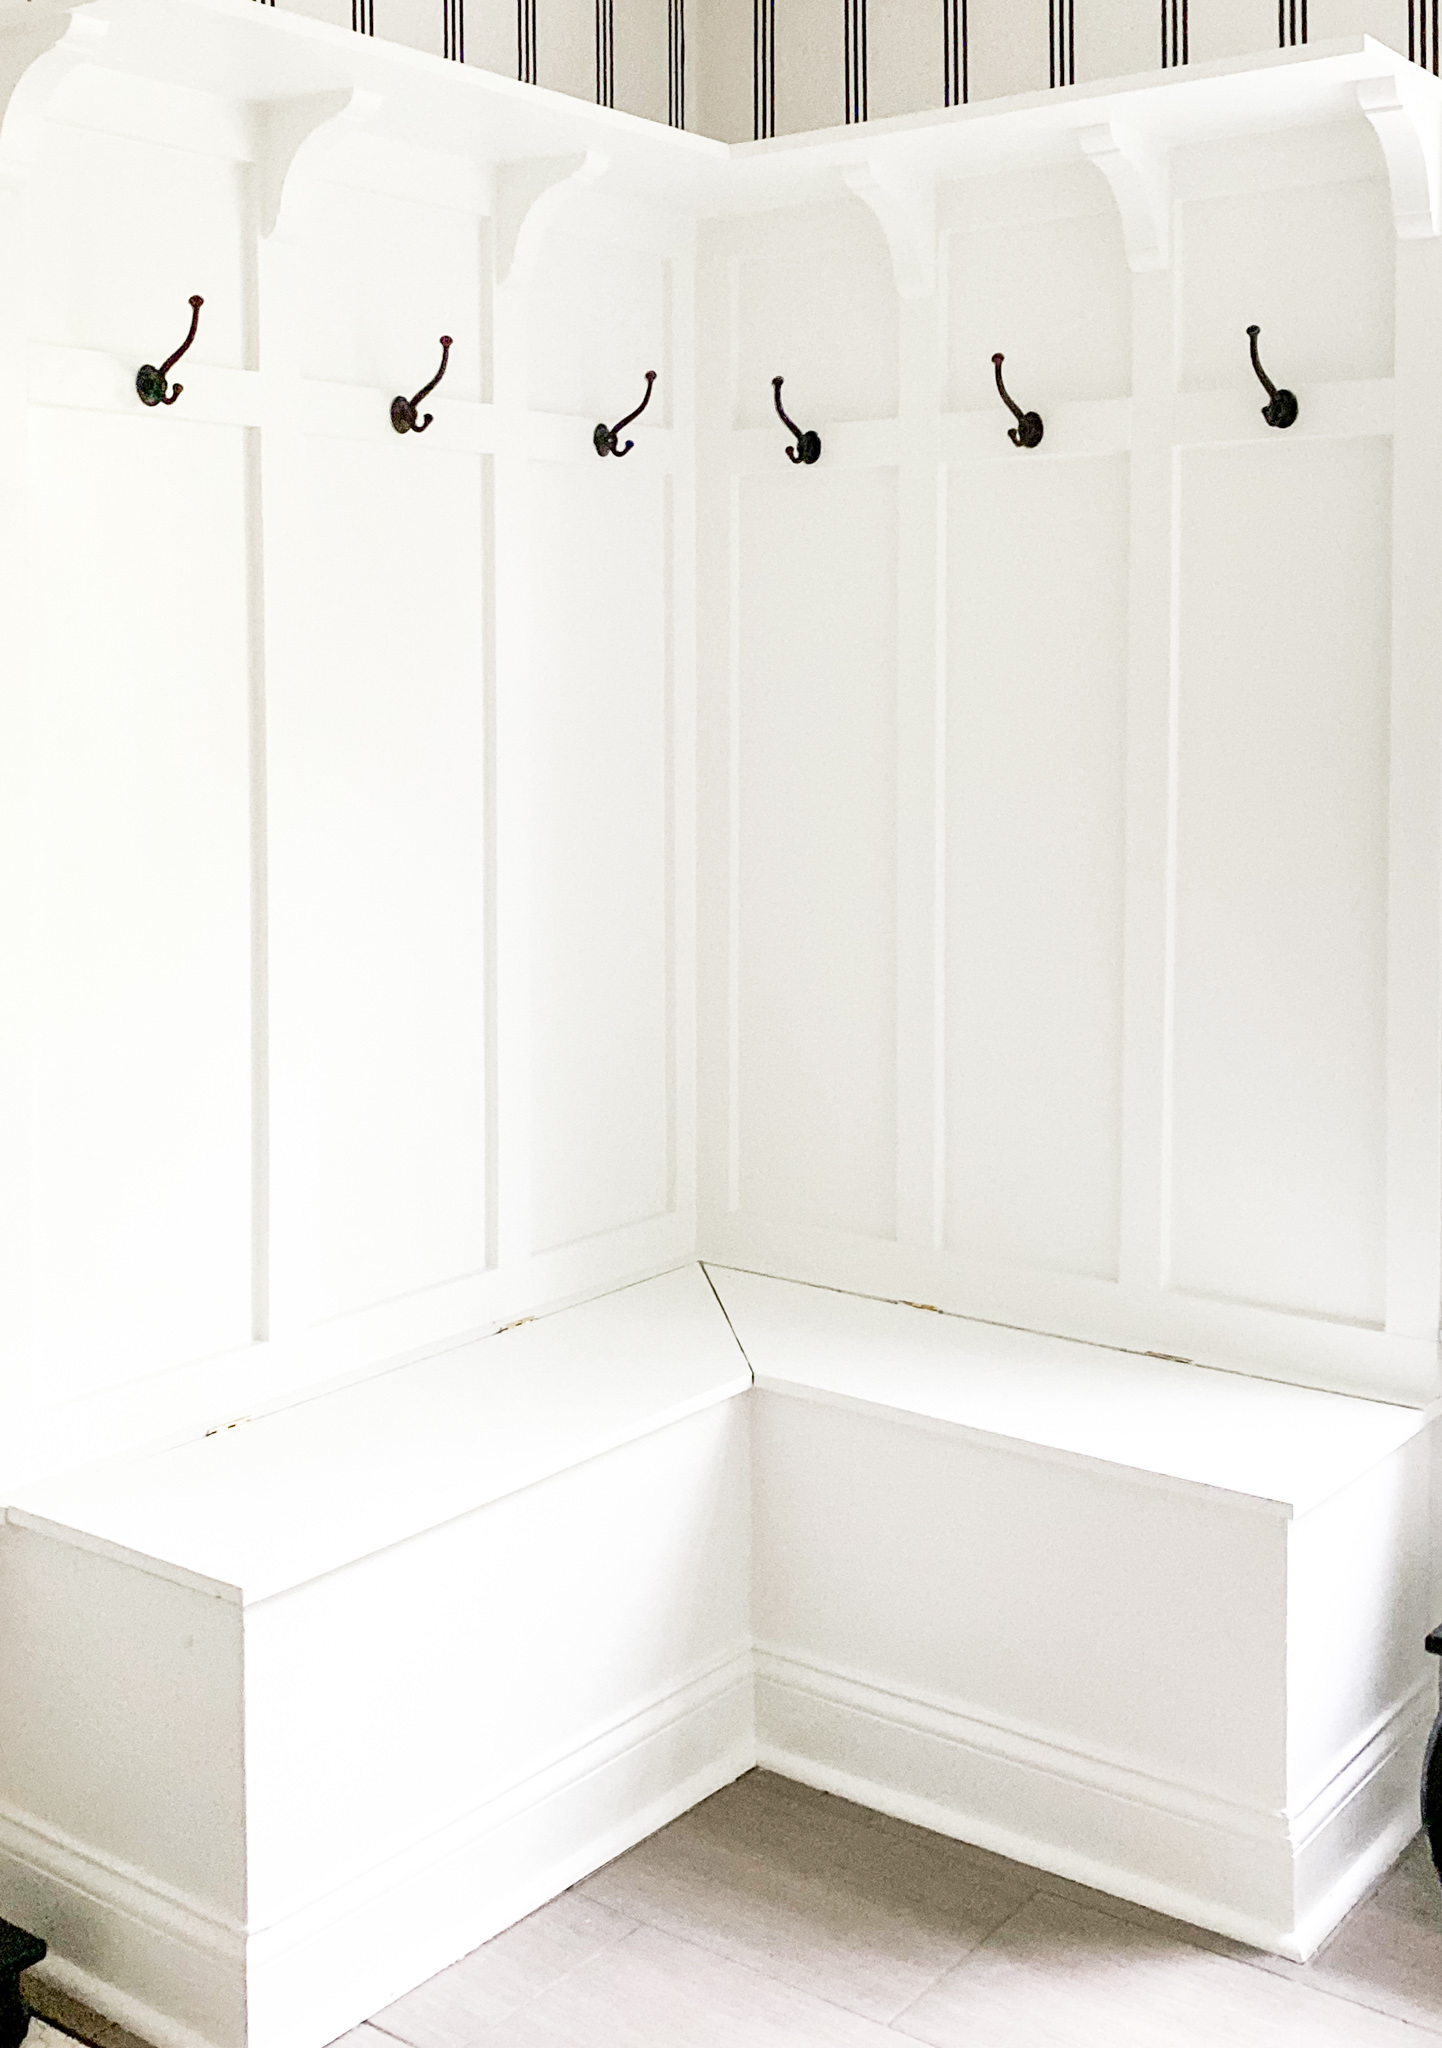
This little corner makes me so happy every-time I walk into this room.

You can kind of see a sneak peek of the wallpaper above, but next week I’m revealing that! This is a small room, so bare with me as I quite literally only show you tiny sections until the final reveal!

You can read my mood board from Week 1 here. And follow along other’s progress on their ORC rooms here.

Today is supposed to be rainy again, but I need to get some work done, so first, coffee!

Have you heard of One Room Challenge before?  What house project are you currently working on?  Let me know in a comment below!

XX


Share this:

  • Click to share on Facebook (Opens in new window)
  • Click to share on Twitter (Opens in new window)
  • Click to share on Pinterest (Opens in new window)
  • Click to email a link to a friend (Opens in new window)

Related

Filed Under: at home, CB&BP, decor

Comments

  1. AvatarJenny Ellis says

    May 22, 2020 at 10:39 AM

    Girl, it looks amazing!! Love the bench and the hooks to hang your coats or bags on! Y’all did sooooo good!!

  2. AvatarJenna Pilant of Room Bloom Design says

    May 24, 2020 at 3:10 AM

    Can’t wait for next week!

  • Bloglovin
  • Email
  • Facebook
  • Instagram
  • Pinterest
  • Snapchat
  • Twitter

Instagram @amy_cbandbp

Currently Loving: Fashion

Currently Loving: Home

Currently Loving: Baby Gear

Advertise

Archives

Categories

Recent Posts

  • Moose Joy Toys with My Girl
  • Hard to Shop for Holiday Gift Ideas
  • 5 Tips for Easy School Mornings
  • Summer Home Check List
  • Office Bathroom Glow Up

Follow my Pins

  • 2023 let's do it! #sponsored I haven't been able to run in SO long and thanks to @athletico_pt, I'm getting back into the swing of things. You can get a free assessment today by visiting the link in my bio! *Per federal guidelines, beneficiaries of plans such as Medicare, Medicaid, Tricare, VHA and other federally funded plans are not eligible for free assessments.
  • Does your laundry room look hectic like this today? Want to know something that makes it easier? Auto Dispense. Yes please. The @samsung_home Bespoke Washer can store and auto dispense up to 32 loads of detergent and softener, so you don't waste detergent? How about that for #smart Can I get a hallelujah!? Click here to learn more! https://bit.ly/3hnkMem #SamsungBespoke #SamsungBespokeAILaundry #BespokeAILaundry #Sustainability Sponsored by Samsung
  • Meet my new Samsung Bespoke Washer and Dryer. I've never been so in love with an appliance before. The new AI Smart Dial remembers past cycle settings, saving you time and energy in the laundry room. Click below to learn more! #SamsungBespoke #SamsungBespokeAILaundry #BespokeAILaundry #Sustainability @sumsung_home
  • No more running the dryer over and over again until your clothes are dry. With the new Bespoke Dryer AI Optimal Dry feature, our dryer triggers when the clothing is dry and automatically turns off saving time and energy on laundry day and more time snuggling on the couch. :) Click below to learn more! #SamsungBespoke #SamsungBespokeAILaundry #BespokeAILaundry #Sustainability______
Dealspotr
Dealspotr.com

Copyright © 2025 · Coffee Beans and Bobby Pins · Site Design by How Sweet Designs

We are using cookies to give you the best experience on our website.

You can find out more about which cookies we are using or switch them off in settings.

Coffee Beans and Bobby Pins
Powered by  GDPR Cookie Compliance
Privacy Overview

This website uses cookies so that we can provide you with the best user experience possible. Cookie information is stored in your browser and performs functions such as recognising you when you return to our website and helping our team to understand which sections of the website you find most interesting and useful.

Strictly Necessary Cookies

Strictly Necessary Cookie should be enabled at all times so that we can save your preferences for cookie settings.

If you disable this cookie, we will not be able to save your preferences. This means that every time you visit this website you will need to enable or disable cookies again.